If you build an astronomy device and want to control it with some awesome PC software, then you need to write an ASCOM (AStronomy Common Object Model) driver. There are great resources available for writing a single ASCOM driver for your DIY astronomy equipment. Check out the video on the ASCOM website for a guide on writing a single-device driver! But say, for instance, you have two devices (a Telescope and a Focuser) and would like to control them with one microcontroller. Or say you want to control your telescope with Astrophotography Toolkit AND PHD2 at the same time. Then you need to write a Driver Server!
Unfortunately there aren’t any good step-by-step guides available for only somewhat computer literate people like me. I’ll give Kudos to the ASCOM server template ReadMe, it’s well-written. However, I still had lots of confusion and frustration putting together a local server. Today we are going to go through converting a functional driver(s) into a local server.
NOTE: This is basically my personal guide to writing the local server. I decided it may be of use to others who wish to do the same thing. I am constantly trying to improve the driver, and this post will be updated as I come across improvements and issues.
I’m going to refer to the 13 main steps outlined in the ASCOM Local Server Template Guide steps using this syntax: [1] corresponds to the template guide’s first step, and so on.
The software I’m using is MS Visual Studio 2015, ASCOM 2016, and Inno 5.3.3(a). MAKE SURE you have this version of Inno – the newer version I used first was not compatible. The driver and firmware for my telescope / focuser is available at https://github.com/td0g/tracker3.0.
Starting From The Template
I’m assuming you have a functional driver(s) written in C#. The server template is in C#. If you wrote yours in VB, then I would suggest converting them to C# first.
Start by opening Visual Studio, and selecting File -> New Project -> C# -> Templates -> Visual C# -> ASCOM 6 Local Server Template (C#). Enter a Name for the server project (My driver is named ‘DeE’). Select ‘Ok’.
You will be brought to the server template ReadMe.
[1] Select Project -> DeE Properties (last item in the drop-down menu). Under the Application tab, change the Assembly name and Default namespace to ASCOM.DeE (my version defaults the Assembly name to ASCOM.DeE.Server, so remove .Server).
[2] Select File -> Add -> Existing Project, then browse to the individual device drivers you want to include in the local server (in my case, I had a focuser driver and a telescope driver). Select the .csproj file. Repeat for each driver.
NOTE: If you haven’t developed the device driver already, the select New Project instead of Existing Project [3]. I would not recommend this since developing the Local Server is already complicated, and troubleshooting an individual device driver will give you a bad headache. HOWEVER – starting as a New Project has the benefit of having most of the following steps already completed. Your choice.
[4] Select Build -> Build Solution.
Modifications to Your Driver(s)
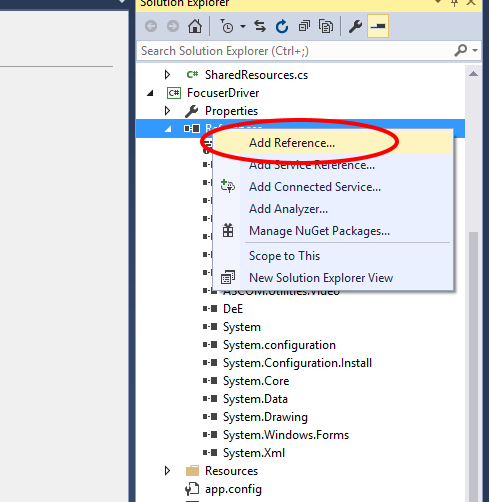
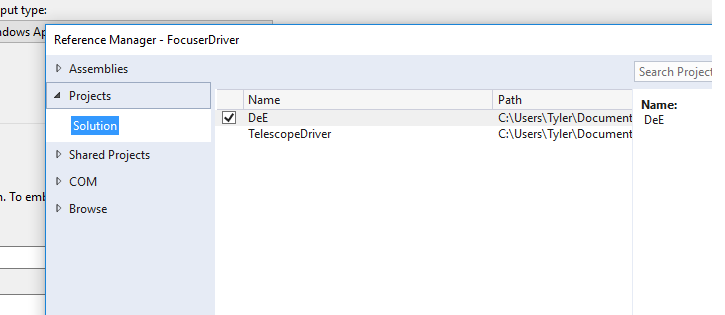
[5] In each device driver on the right-side pane, right-click References and select Add Reference… Then select the Local Server driver only. Click Ok.
[6a] Select Edit -> Find & Replace -> Find In Files. Search for the name of the device driver (eg. FocuserDriver) and replace with the Local Server name (eg. DeE). In my case, I didn’t have to do any replacements.
[6b] For each individual device driver, double-click the Properties tab and make sure the Assembly name is ASCOM.DeE.deviceName (eg. Focuser or Telescope).
[6c] For each individual device driver, double-click the Properties tab, select Assembly Information, and check the Product Name and Make Assembly COM-Visible
[6d] Still in the project tab, select the Build tab on the left side. Check Register for COM interop.
[6e] In each single device driver’s Driver.cs file, search for the ‘public class Focuser :’ line. Add ‘ReferenceCountedObjectBase, ‘ to the line so it looks like this:
public class Telescope : ReferenceCountedObjectBase, ITelescopeV3
[6f] Remove the entire section in each device driver starting with ‘#region ASCOM Registration’ to ‘#endregion’.
[6g] In each Driver.cs file, remove DriverID and DriverDescription strings.
[6h] In each Driver.cs file, find the line that begins with ‘[Guid(…..’ and replace with the following:
                [Guid("0AE8B38D-10A1-4A8D-A5B7-1B050F74B48B")]  // set by the template
                [ProgId("ASCOM.DeE.Telescope")]
                [ServedClassName ("DeE Telescope")]
                [ClassInterface(ClassInterfaceType.None)]
                public class Telescope : ReferenceCountedObjectBase , ITelescope
Serial Communications
[7, 8] When you wrote your individual device drivers, you probably had a small number of functions to handle serial communications with you device. But now the serial port will be shared among multiple devices and applications.
This isn’t hard to deal with. Move your serial communication functions to the sharedResources namespace. Then the driver server will make a queue for all serial communication requests.
I’m going to mention my strategy for Serial Communication. I use three Serial Communication functions: SendMessageBlind, SendMessageString, and SendMessageValue.
- SendMessageBlind sends a message, terminates it with a NewLine character (“\n”), and does not wait for a reply.
- SendMessageString does the same thing, but it waits for a reply from the microcontroller. The amount of time it waits is set by the SharedSerial.ReceiveTimeoutMs parameter (which should be set in the Connected function).
- SendMessageValue is setup to efficiently communicate an integer value. It waits for the microcontroller to reply with the character ‘q’, then waits for another series of values to be transmitted. The driver knows the number of bytes (responseLength) expected from the microcontroller.
val = SharedSerial.ReceiveByte();
if (responseLength > 1) val += SharedSerial.ReceiveByte() * 256;
if (responseLength > 2) val += SharedSerial.ReceiveByte() * 256 * 256;
if (responseLength > 3) val += SharedSerial.ReceiveByte() * 256 * 256 * 256;
The Arduino code writes the bytes using the following scripts:
Serial.print("q");
Serial.write(val % 256);
Serial.write((val >> 8) % 256);
Serial.write((val >> 16) % 256);
[9] Here I assume you will need to use the serial communication port to talk with the microcontroller. This step does not apply.
Creating an Installer
- [10, 11] Compile your driver(s). In Visual Studio, select Build -> Build Solution. This will output all of your driver .dll, .exe, and .whatever else files to the projectName/bin folder.
- Now, in Windows, select Start -> ASCOM -> Driver Installer Script Generator. Here are the settings to select:
- .NET Server COM (exe)
- DeE Server
- DeE, Telescope
- Focuser, 3.10
- Documents/Visual Studio 2015/Projects/DeE/DeE (just before BIN)
- .txt file
- [12, 13] Open Inno v5.3.3(a). Again, CHECK YOUR INNO VERSION. Open the script file created by the last step above. You’ll need to add a section of script to copy each of your individual driver .dll’s into the destination folder. Once they are copied, the installer will run the server .exe file with the /register command. This will be the last step in the install. SEE the image below.
- In Inno, select Build->Build. You can find the installer .exe file in the folder selected above.

Installing the Driver
I added a message box to the installation script, so that I can confirm each individual device driver is installed by a pop-up message box. For instance, if you have a Telescope and a Focuser, then two message boxes displaying ‘Driver Registered’ should pop up in succession. If they don’t, then you may have an issue and the driver won’t work.