A simple trigger for high-speed photography is the ‘tripwire’ trigger. Unfortunately few (if any) commercially available flashes are configured for this trigger. Thankfully, an Arduino-based trigger controller is very easy to make. I will also shamelessly plug Edgerton, an open-source LED flash specifically designed for high-speed photography, that can be tripwire-triggered without any major hardware!
How It Works:
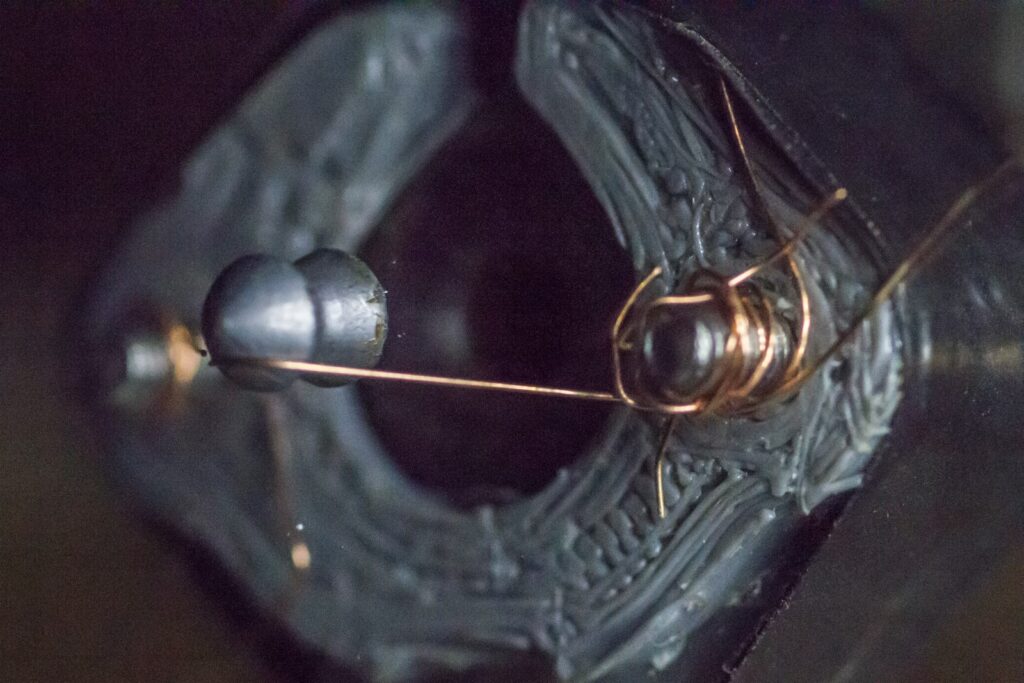
A small bracket must be built for the muzzle of your rifle (or whatever you are using). Two pins protrude from the end of the bracket and a fine wire is wrapped between the pins. The pins are connected to a port (I use a 3.5mm audio port) which can be connected to Edgerton or the trigger controller by an extension cable.
When the projectile exits the muzzle, it passes through the wire and breaks it. The two pins, which were once connected by the wire, are now ‘open’. Edgerton or the flash controller detects that the pins are separated and a timer is started. After the timer finishes, the flash is triggered.
The upside to this method of triggering is the simplicity and low cost. The bracket is simple to build and a flash controller is also quite cheap to make. The disadvantage is that the projectile’s speed must be known in order to trigger at a specific position. Since the tripwire does not measure the projectile’s speed, the user can only set a time delay. If you wanted to photograph a projectile striking a target, you would first need to know the distance to the target AND the speed of the projectile in order to deterimine the time delay.
Another downside is the fact that a tripwire requires care to set up. It must be wound tightly around the pins in order to prevent vibrations or wind from creating a false trigger, but the wire must be fine enough that the projectile’s path of travel isn’t affected.
The Bracket
I designed several 3D printable brackets for various size muzzles. You can find them on Thingiverse here. Print the bracket of your choice, then screw two 12mm or 16mm M3 screws through the holes. Before tightening, wrap a small wire around the screw near the head and connect to a 3.5mm port (one connected to the base and the other connected to the tip). Glue the 3.5mm port onto the bracket, and for additional strength you can wrap the entire bracket in electrical tape.
The Controller
For anyone interested in high-speed photography, I would suggest that they consider building Edgerton. A construction manual is available and no other hardware is required. However, if you want to dip your toes with a regular speedlight or already have another high-speed flash, then an Arduino would perfect for creating the delaying the flash after the tripwire has triggered.
One pin from the tripwire bracket should be connected to ground and the other can be connected to any pin on the Arduino (for simplicity’s sake, lets connect it to pin 2). The pin’s pullup resistor must be used:
pinMode(2, INPUT_PULLUP);
Then, the pin can be continuously polled using the following line:
while (PIND & 0b00000100){};
Once the controller gets past this line, a timer must be set up:
timer = micros();
timer += DELAY_TIME;
while (micros() < timer){};
Then, the output pin can be changed from tristate (INPUT) to low (OUTPUT) for about one second:
pinMode(outputPin, OUTPUT);
delay(1000);
pinMode(outputPin, INPUT);
1 thought on “Cheap Trigger for High-Speed Photography”