The outdoor Roomba! Details coming soon…
The basic concept was demonstrated by Red Green
Test drive of the Lawnba Automated Lawnmore:
Tyler's Invention Blog
The outdoor Roomba! Details coming soon…
The basic concept was demonstrated by Red Green
Test drive of the Lawnba Automated Lawnmore:
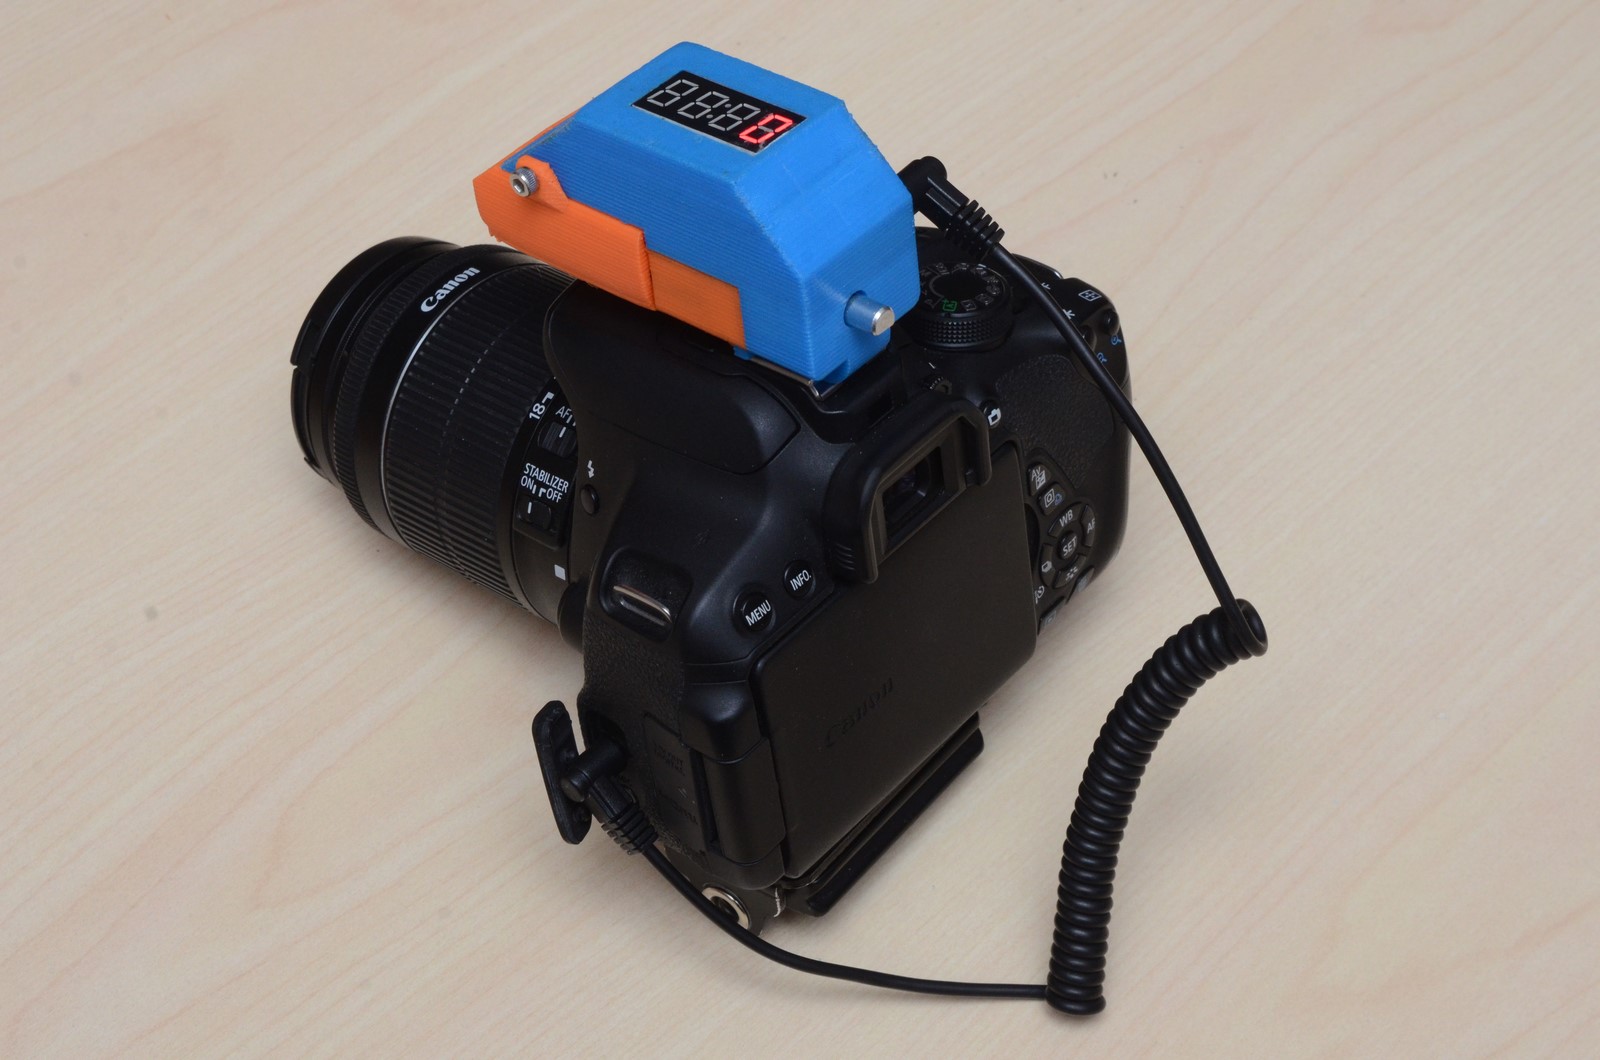
A friend and I set out to build a camera intervalometer for DSLR cameras. Instead of following one of the many build guides available online, we decided to design our own – The Mikro-Chronograph. Check out the feature list:
If you want to build one, just get the components listed, wire them up on a PCB board (look at the photos below for a layout guide), program the ATTiny85 with the available code, and build a case. All of the details can be found on Google Drive. The 3D printed case designs are on Thingiverse.
The V2.1 update produced a working mount, but it unfortunately was not very user friendly. I made a few modifications to improve the setup and aiming time, as well as its ability to disassemble and stow in a modest-sized wood box for storage and transport.
V2.2 (codename: HoLi) is the mount’s final design, as I’m very happy with it and have moved on to building the V3.0. See the photo of Orion’s Nebula below taken using this mount, I’ve been happy with its performance using lenses as long as 300mm.
At the last minute, I purchased a sheet of Baader Planetarium solar film for the eclipse on Monday. With little time to spare, the film was taped to a cardboard box and slid over my telescope. Prayers were made that the wind wouldn’t blow the film off of the scope, and the next day I decided to build a proper holder for the expensive film – $100 CAD for an 8″ x 11″ sheet!
Most DIY astro-tracking mounts can be described as either low-quality barn-door mounts (with questionable door hinges used as pivots) or high-cost and effort equatorial mounts (typically equipped with complex drive systems). The original Tracker V2 was designed to be an attempt to combine low-cost and high-quality elements in a single mount. The basic design could be described as a hybrid barn-door/equatorial style mount.
That said, Tracker V2 was tested using a 250mm lens on a cropped-sensor camera and did not produce sharp OR consistent images! Further examination at the shop revealed that the 10-32 nut and threaded rod caused the arm to advance erratically. There was no way to eliminate or even mitigate the issue, so a bit of an overhaul was in order. Enter: Tracker V2.1!
NOTE: While the V2.1 modification corrected the drive issue and made the device useful for unguided DSO astrophotography, it suffered from usability issues which made setup and targeting very difficult. Improvements were made for the V2.2 upgrade, which concludes this project. I currently building a V3, which will be another screw & arm-driven equatorial. It will have 2-axis auto-guiding among other improvements over the V2.x design (which has admittedly been a product of evolution rather than design and planning).
Wood burning is a popular hobby which can become quite expensive. A quality wood burning system consists of: 1. A pen or selection of pens and 2. A power supply (station). I decided to invest in a series of Razertip wood burning pens simply because they were available at a local Lee Valley Tools store. They also have a 1-year unconditional warranty! If I end up destroying a pen with a home-built supply then we will find out just how unconditional the warranty is. The pens are available for ~$30 each, which can become a significant investment if you want more than one or two. The stations run for $165 and up, which is the same price as six pens! So lets ditch the station.
2020-07-14 – If you’re interested in building a ballistic chronograph, check out the new 3D-printed MK2 design at td0g.ca/2020/04/19/ballistic-chronograph-mk2-diy/. If you would like to purchase sensors for building a chronograph, they are available at https://www.tindie.com/products/19828/.
A ballistic chronograph is an instrument which measures the speed of very fast things (like bullets). I decided to build a DIY Chronograph which could be used for high-speed photography, such as glassware getting shot with an air-powered rifle (see my other post on this topic or my Flickr album). In order to take such a photo, you need to be able to trigger a flash at just the right moment, which will freeze all the juicy action.
There are numerous resources available which give very limited information on how to build such an instrument. Unfortunately all of the resources are incomplete or describe an instrument which only works for slower objects, such as paintballs or airsoft pellets. I designed and built this using the information available on the internet, my modest understanding of electronics, and many hours of trial-and-error. To somebody who has some knowledge of electronic components, this post can be used to build an instrument useful for measuring the speed of objects travelling up to 1,000 m/s (such as high-powered rifle bullets), and even photographing a projectile ‘interacting’ with other objects!
What does a wine glass look like when it’s shot? (TL;DR have a look at my flickr album)
This obvious question was asked when my wife provided me with three wine glasses which were used to keep her Siamese Fighting Fish. She couldn’t bring herself to drink from them after their use as aquariums. So I decided to destroy them and make a few attempts at high-speed photography!
How many different flavour combinations are possible at Peters’?
Thought I’d share a couple projects from my youth…
First: The CRA-Z-BOY
What happens when you have a chair and pair of skis sitting around? In short, the Cadillac of the hills!