An Update

Hello fellow enthusiasts,

This is an apology and an explanation. Over the past several years I’ve benefited a TON from the open-source community and had lots of fun coming up with my own designs. I’ve worked hard to document and share those designs online.

This pandemic has opened up a couple cool opportunities for me within my own community, and I’ve shifted my focus from the fun projects on this website to volunteering here in my hometown. This won’t last forever, but for the time I am just very short on time for hobbies (and that sadly includes photography, my ‘leisure hobby’).

I hope to return to developing and maintaining these projects SOON, but there’s no time frame in place right now. It’s been so much fun corresponding with you all and I miss that. I’m planning on allocating time each week to replying to emails and comments, so hopefully I won’t need to apologize again!

Now with that said, I’ve had just a little bit of time to develop the ballistic chronograph sensors. The new LG0 Rev 4 board design is complete and will be slightly cheaper and have two status LED’s. A brand-new LG1 board is nearly complete will have the same basic design and footprint, but additional circuitry will have two additional outputs and status LED’s: ‘Trigger-Low‘ and ‘Trigger-High‘ indicate whether the trigger state has gone low or high in the past 0.2 seconds. This will allow for easier setup and compatibility with poorly-optimized firmware. These boards will hopefully enter production soon.

Very Best,

Tyler

Enhanced Speedlight Strobe Duration Testing

Using Speedlight Strobes for High-Speed Photography

Thanks to various sources on the internet, I learned that speedlight strobes are fairly fast but not quite fast enough to truly freeze a bullet. Speedlights work differently than studio strobes in that the flash exposure is controlled by the amount of time that the IGBT is turned on and current is flowing through the xenon flashtube.  So the best power level for high-speed photography is the minimum power setting, typically 1/128.

Testing flash strobe duration

However, during the TTL pre-flash, speedlight strobes will emit an even shorter flash pulse! This extra-short flash is not an available setting, but Cactus appears to have figured out how to command an extra-short flash and their V6 transceiver has an option for extra-quick strobe duration: LO.

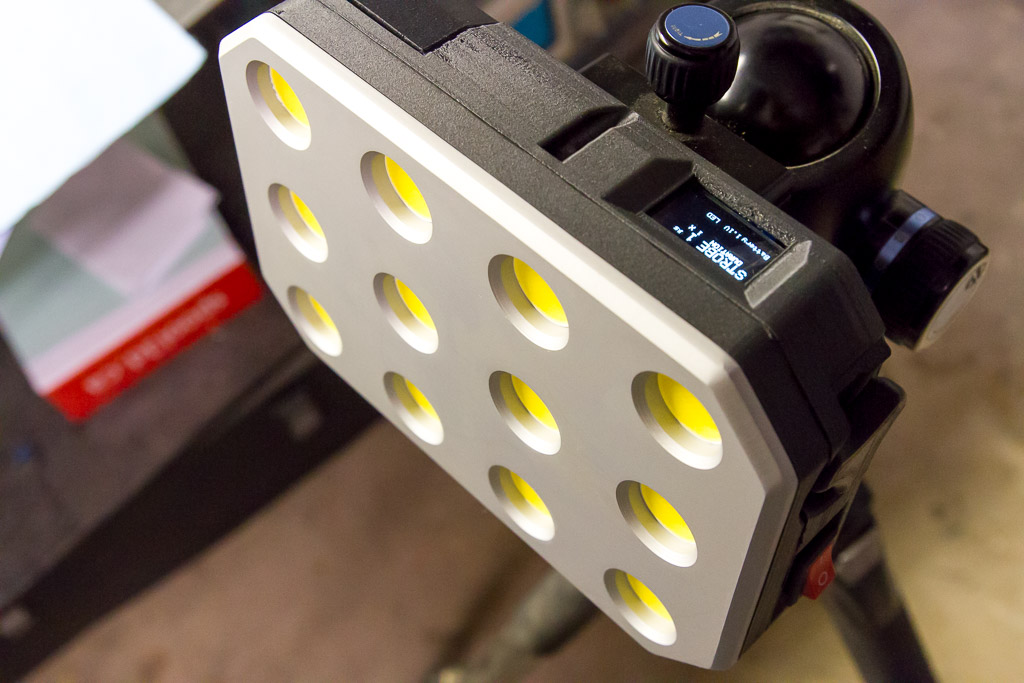
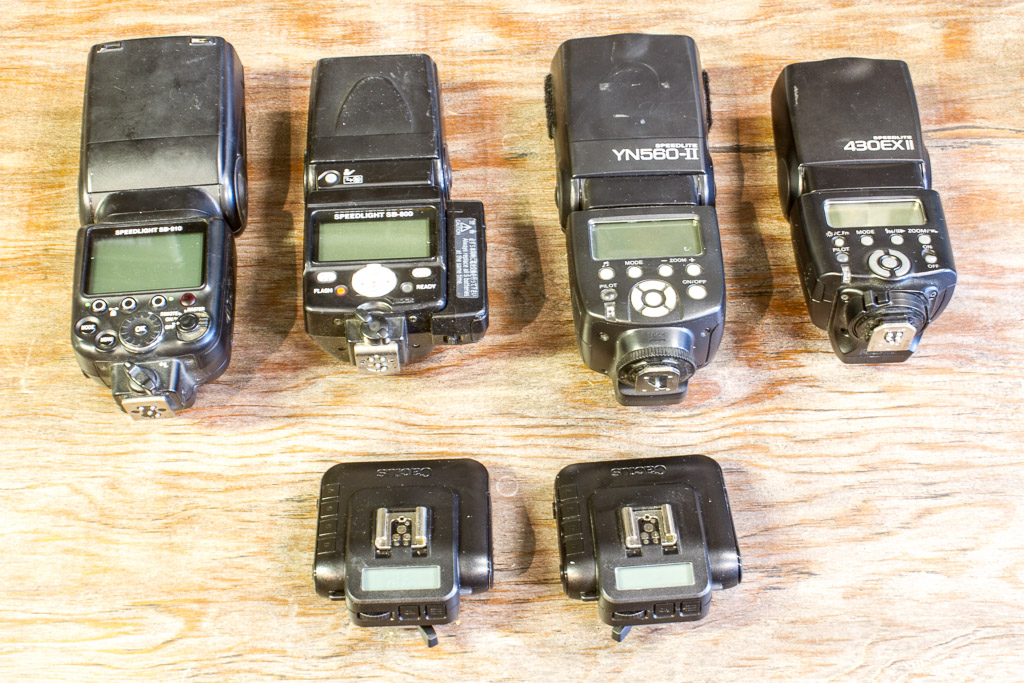
In an effort to find the best speedlight strobe for high-speed phtogoraphy, I tested four Speedlight strobes (Nikon SB-910, Nikon SB-800, Yongnuo YN-460 II, and Canon 430EX-II) both with AND without the Cactus transciever.  The bottom line still remains: an LED flash still outperforms any speedlight strobe in terms of speed!

Read more

Simple Tally Light for OBS Studio

OBS Studio Tally Light

A FULLY Plug-and-Play Tally Light

My church (like many others) recently began streaming sunday services.  The staff had quite a job on their hands adjusting from a live audience with a small online presence to an online-only presence.  Subtle communication between the ‘techies’ and ‘actors’ was difficult, but a simple tally light made it simple to send a queue to the staff on camera automatically.  A tally light is simply a light that turns on when the camera is recording.

This tally light is a simple Raspberry Pi-based system which connects with OBS Studio over the network and illuminates a lamp when the camera is live.  The system does not need any external input – it will find OBS studio and save its address for future sessions.  If OBS studio moves to another PC, it will still find it.  The camera illumination is configured in OBS studio, so no need to change anything on the tally light.  Finally, if OBS Studio gets disconnected for whatever reason, the tally light will turn off and the Pi will immediately begin searching for OBS Studio again.

Read more

Ballistic Chronograph MK2 #DIY

DIY 3D Printed Ballistic Chronograph

A 3D Printed Ballistic Chronograph for $70 – $100 USD!

This ballistic chronograph is based on my original design, the MK1 (which can be viewed at https://td0g.ca/2016/07/28/ballistic-chronograph/). I’ve used the MK1 to take many high-speed photos, including a shot of a mach-2 bullet hitting a nice wine glass!  The new MK2 has the same performance as the original, but is much easier to construct.  It can be used for measuring high-powered rifles, paintball guns, and everything between!

3D Printed Ballistic Chronograph

Read more

High-Voltage FLASH Programming on ATTINY85

ATTINY85 High-Voltage Programmer

The Bubblegum Chip, Now With Steroids!

The Atmel ATTINY85 is a great chip (cheap, easy to use, supported in the Arduino IDE).  Unfortunately it only has 5 IO pins, which limits its usability.  There are guides on using a High-Voltage Programmer (HVP) to change the Reset pin into an IO pin.  However, that prevents you from programming the Flash (Program Memory) until you re-enable the Reset pin.

Thankfully the Flash can be programmed with an HVP, but the commands and protocol are different.  My USBtinyISP simply cannot be modified to be an HVP.  Using an Arduino as ISP (In-Service Programmer) on an ATTINY85 is fairly simple but doesn’t work if the Reset pin is disabled.

Read more

Simple Sonic Anemometer #DIY

DIY Sonic Anomemoter

Measuring Air Flow – Made Easy

A sonic anemometer is a device that measures air velocity using sound. A speaker on one end of the device emits a ‘ping’, and a sensor waits for the ping to arrive. If the air is not moving, then the delay between ‘pinging’ and ‘receiving’ is always the same (kinda).

If the air is moving from the sensor toward the emitter, then the delay gets longer since the ping is traveling upstream. Conversely, if the air is moving from the emitter toward the sensor, then the delay gets shorter since the ping is traveling downstream.

I built this anemometer to measure airflow rates of various small fans.

Ingredients

All you need is an Arduino, an HC-SR04 ultrasonic distance sensor, a piece of 3/4″ PVC conduit, and a 3D printer. The 3D print file and firmware is available on Github.

3D Printed Sonic Anemometer

Read more

PCB Jig + Lab Power Supply #DIY

I recently added a couple home-build devices to my home lab. The first is a well-designed PCB jig engineered by an electronics forensic expert. The second is a very cheap lab power supply using a Chinese step-down converter and an old battery charger.

The Jig

It seems I never have enough hands, especially while testing and troubleshooting a fresh PCB. As frustration was mounting recently, Thingiverse member Giufini seemingly heard my prayers – and shared his design for a PCB probe jig!

Thingiverse photo

At first glance, it looks somewhat hap-hazard. I built one, and must say that it is very well designed! The layout of the board is perfect for the PCB’s I work with. The towers and arms are easy to adjust and have a well-tuned flexibility to them. Finally, the acupuncture needles were simply genius! This design was even reviewed (and quite well received) on Superhouse.

PCB Probing Jig DIY

Read more

500W Spindle Controller – Fixed!

You Get What You Pay For

While building my CNC mill, I bought a 500W spindle with a motor controller off eBay for less than $80 CAD.  The spindle and power supply needed some TLC right out of the box, but seemed to work fine.

Image From eBay of 500W Spindle & Controller

Then the incident happened… I was adjusting the ‘MAX’ potentiometer when suddenly the motor speed dropped to 5,000 RPM and wouldn’t increase!  I may have accidentally shorted the potentiometer with my screwdriver, but that shouldn’t have caused a problem.  This potentiometer is basically shorted to 0 ohms at one end anyways.

No adjustments to any of the potentiometers would change the motor speed more than a few hundred RPM.  I considered buying a replacement controller, but for $50 CAD I decided to have a crack at repairing this unit.  I ended up writing an almost-complete schematic of the controller and determining what one of the three IC’s are.

Schematic for 500W Spindle Controller / Power Supply

Read more